现在我们要创建一个Windows外壳程序,将单调的Windows运行细节隐藏,
Win32/DirectX编程就变得类似于32位DOS的编程过程。在构建好的代码结构下,
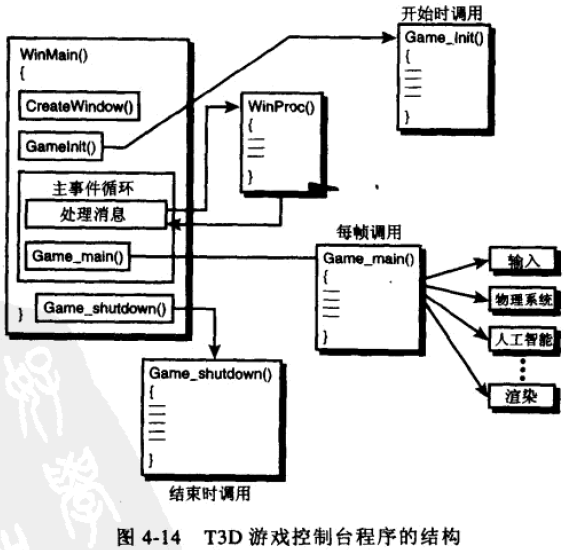
我们只需关心Game_*几个有关游戏逻辑的方法就行了。
1.Game_Init()
Game_Init()在WinMain()中的主事件循环之前被调用,并且仅调用一次。它用于初始化游戏
所需的各种资源,如获得资源设备描述表DC。
2.Game_Main()
Game_Main()在主事件循环中每次处理Windows消息之后被调用一次,应当在Game_Main()中
处理所有的图像渲染、声音、人工智能等内容。需要注意的是你必须仅绘制一帧画面然后就
返回。
3.Game_Shutdown()
Game_Shutdown()在主事件循环退出后被调用,清除游戏中被分配的所有资源。
#define WIN32_LEAN_AND_MEAN
#include <windows.h>
#include <windowsx.h>


// DEFINE AND GLOBALS //////////////////////////////////////////////////
#define WINDOW_CLASS_NAME "WINCLASS1"
#define KEYDOWN(vk_code) ((GetAsyncKeyState(vk_code) & 0x8000) ? 1 : 0)
#define KEYUP(vk_code) ((GetAsyncKeyState(vk_code) & 0x8000) ? 0 : 1)

HWND main_window_handle = NULL;
HINSTANCE hinstance_app = NULL;
char buffer[80];


// Function prototype //////////////////////////////////////////////////

LRESULT CALLBACK WindowProc(HWND, UINT, WPARAM, LPARAM);

int Game_Init(void *parms = NULL, int num_parms = 0);
int Game_Main(void *parms = NULL, int num_parms = 0);
int Game_Shutdown(void *parms = NULL, int num_parms = 0);


// WINMAIN ////////////////////////////////////////

int WINAPI WinMain(HINSTANCE hinstance,
					HINSTANCE hprevinstance,
					LPSTR lpcmdline,
					int ncmdshow)
{
	WNDCLASSEX winclass;
	HWND hwnd;
	MSG msg;

	// 1. Fill in the window class structure
	winclass.cbSize = sizeof(WNDCLASSEX);
	winclass.style = CS_DBLCLKS | CS_OWNDC |
					 CS_HREDRAW | CS_VREDRAW;
	winclass.lpfnWndProc = WindowProc;
	winclass.cbClsExtra = 0;
	winclass.cbWndExtra = 0;
	winclass.hInstance = hinstance;
	winclass.hIcon = LoadIcon(NULL, IDI_APPLICATION);
	winclass.hCursor = LoadCursor(NULL, IDC_ARROW);
	winclass.hbrBackground = (HBRUSH) GetStockObject(BLACK_BRUSH);
	winclass.lpszMenuName = NULL;
	winclass.lpszClassName = WINDOW_CLASS_NAME;
	winclass.hIconSm = LoadIcon(NULL, IDI_APPLICATION);

	// 2. Register the window class
	if (!RegisterClassEx(&winclass))
		return (0);

	// 3. Create window
	if (!(hwnd = CreateWindowEx(NULL,
								WINDOW_CLASS_NAME,
								"T3D Game Console Version 1.0",
								WS_OVERLAPPEDWINDOW | WS_VISIBLE,
								0, 0,
								400, 300,
								NULL,
								NULL,
								hinstance,
								NULL)))
		return (0);

	// Save global handle
	main_window_handle = hwnd;
	hinstance_app = hinstance;

	// Initialize game here
	Game_Init();

	while (TRUE)
	{
		// Retrieve message
		if (PeekMessage(&msg, NULL, 0, 0, PM_REMOVE))
		{
			if (msg.message == WM_QUIT)
				break;
			TranslateMessage(&msg);
			DispatchMessage(&msg);
		}

		// Main game processing goes here
		Game_Main();
	}

	// Closedown game here
	Game_Shutdown();

	return msg.wParam;
}

///////////////////////////////////////////////////////

LRESULT CALLBACK WindowProc(HWND hwnd,
							UINT msg,
							WPARAM wparam,
							LPARAM lparam)
{
	PAINTSTRUCT ps;
	HDC hdc;
	switch(msg)
	{
	case WM_CREATE:
		return (0);
	case WM_PAINT:
		hdc = BeginPaint(hwnd, &ps);
		EndPaint(hwnd, &ps);
		return (0);
	case WM_DESTROY:
		PostQuitMessage(0);
		return (0);
	default:
		break;
	}
	return (DefWindowProc(hwnd, msg, wparam, lparam));
}

///////////////////////////////////////////////////////

int Game_Init(void *parms, int num_parms)
{
	return (1);
}

///////////////////////////////////////////////////////

int Game_Main(void *parms, int num_parms)
{
	DWORD start_time = GetTickCount();

	// Lock time to 30 fps (1s / 30 = 33ms)
	while ((GetTickCount() - start_time) < 33);

	if (KEYDOWN(VK_ESCAPE))
		SendMessage(main_window_handle, WM_CLOSE, 0, 0);
	return (1);
}

////////////////////////////////////////////////////////

int Game_Shutdown(void *parms, int num_parms)
{
	return (1);
}
下面是一个流星的具体实例,我们在Game_Init()随机初始化256个小星星。之后
每一帧绘制时,首先擦除掉星星位置上的点,之后将星星向屏幕右侧移动并检测
是否到达屏幕边界,最后在新位置上绘制星星。这样就可以进入下一轮的主事件
循环了。
///////////////////////////////////////////////////////
#define NUM_STARS 256
#define WINDOW_WIDTH 400
#define WINDOW_HEIGHT 300

typedef struct STAR_TYP {
	int x, y;
	int vel;
	COLORREF col;
} STAR, *STAR_PTR;

HDC global_dc = NULL;
STAR stars[NUM_STARS];

void Erase_Stars(void);
void Draw_Stars(void);
void Move_Stars(void);
void Init_Stars(void);

///////////////////////////////////////////////////////

int Game_Init(void *parms, int num_parms)
{
	global_dc = GetDC(main_window_handle);
	Init_Stars();
	return (1);
}

///////////////////////////////////////////////////////

int Game_Main(void *parms, int num_parms)
{
	DWORD start_time = GetTickCount();

	Erase_Stars();
	Move_Stars();
	Draw_Stars();

	// Lock time to 30 fps (1s / 30 = 33ms)
	while ((GetTickCount() - start_time) < 33);

	if (KEYDOWN(VK_ESCAPE))
		SendMessage(main_window_handle, WM_CLOSE, 0, 0);
	return (1);
}

////////////////////////////////////////////////////////

int Game_Shutdown(void *parms, int num_parms)
{
	ReleaseDC(main_window_handle, global_dc);
	return (1);
}

////////////////////////////////////////////////////////
void Init_Stars(void)
{
	for (int index = 0; index < NUM_STARS; index++)
	{
		stars[index].x = rand() % WINDOW_WIDTH;
		stars[index].y = rand() % WINDOW_HEIGHT;

		// random velocity 1-16
		stars[index].vel = 1 + rand() % 16;

		int intensity = 15 * (17 - stars[index].vel);
		stars[index].col = RGB(intensity, intensity, intensity);
	}
}

void Erase_Stars(void)
{
	for (int index = 0; index < NUM_STARS; index++)
		SetPixel(global_dc, stars[index].x, stars[index].y, RGB(0, 0, 0));
}

void Draw_Stars(void)
{
	for (int index = 0; index < NUM_STARS; index++)
		SetPixel(global_dc, stars[index].x, stars[index].y, stars[index].col);
}

void Move_Stars(void)
{
	for (int index = 0; index < NUM_STARS; index++)
	{
		stars[index].x += stars[index].vel;
		if (stars[index].x >= WINDOW_WIDTH)
			stars[index].x -= WINDOW_WIDTH;
	}
}
运行起来就是这个样子了。
这是一个使用GDI绘图的不错的小程序,该程序演示了擦除、移动、绘制动画的循环。
第一部分总结
在第2章我们通过一个简单的Windows程序学习了创建一个最简单Windows窗体的步骤:
创建Windows类,注册它,然后创建窗体,编写事件处理函数,最后编写主事件循环
从事件队列获取并分发消息到事件处理函数。并且我们还学会了使用PeekMessage()
而不是阻塞的GetMessage()编写实时的事件循环。
第3章我们学会了如何创建图标、光标、字符串等等各种资源,并在程序中引用它们。
同时我们还学习了GDI基础知识,获得DC句柄,调用TextOut输出文字。以及重要的
窗口、键盘、鼠标事件处理。
第4章我们学习了GDI高级部分绘制各种图形,定时器,常用的按钮等小控件。至此我们
已经掌握了足够的Windows编程知识来应对游戏编程,下面是总结的知识列表,留作日后
复习使用:
1.Windows程序构建步骤:WNDCLASS类、注册、创建窗体、事件处理函数、主事件循环。
2.用PeekMessage()编写实时的事件循环
3.使用图标、光标、字符串等资源,并了解VS自动产生的.RC文件和资源索引文件中有什么。
4.处理常见窗口、键盘、鼠标消息,如WM_CLOSE,WM_SIZE,获得按键,WM_MOUSE*。
5.用GDI绘制文本、点线及各种图形。
6.通过检查系统时钟来控制程序刷新的帧频。
7.使用简单的小控件,如按钮、文本框等等。
接下来我们将进入DirectX的神奇世界!
分享到:


相关推荐
第一部分 Windows编程基础 第一章 无尽之旅 历史一瞥 设计游戏 游戏类型 集思广益 设计文档和情节图板 使游戏具有趣味性 游戏的构成 常规游戏编程指导 使用工具 从准备到完成一使用编译器 ...
士研电机时间继电器T2D/T3D/T4D说明书pdf,士研电机时间继电器T2D/T3D/T4D说明书:使用石英掁荡器,其精确度不受温度及电压变化之影响,清晰及确实之数字设定,可防止设定上的错误时间范围,可承制自动归零功能(代号S...
士研电机时间继电器T2D-T/T3D-T说明书pdf,士研电机时间继电器T2D-T/T3D-T说明书:可经由按键开关选择时间单位,时间范围广泛,适用于各种控制场合,使用石英掁荡器,其精确度不受温度及电压变化之影响,清晰及确实之...
t3d.zip
全志T3硬件手册
用T3D游戏框做的贪吃蛇,你们可以改进改进……
T3方案大屏导航语音助手主程序。山寨智能导航语音
中兴F650A 天翼2.0 V2.0.0P1T3 编程器固件,手工提取自2018年3月出产的光猫中,是最后一批天翼2.0版本的光猫了,需要的可以下载,编程器刷入。
用友T3普及版软件操作程序
Python语言程序设计课件
将T3升级到T3 10.6PLUS1,然后通过输出U6,将数据输出,卸载T3,然后安装T6并安装T3升T6工具,再通过T6升级工具引入到T6中并升级SQL SERVER 数据库,升级完之后再输出并引入U8V10中升级。 方法2(如果只涉及总账升级...
Fuhlen富勒T3无线触控鼠标驱动1.0版For WinXP-32/WinXP-64/Vista-32/Vista-64/Win7-32/Win7-64/Win8-32/Win8-64(2013年12月13日发布)触控掌握天下,为WIN8应运而生。是富勒在触控产品与传统鼠标中,寻找到的一个新...
下穿 T3 均线是开多单信号, 上穿 T3 均线是开空单信号。
用友通T3标准版财务部分详细使用说明书,欢迎大家下载
用友T3数据库字典,可直接修改数据库,简单好用,如设计权益问题请及时联系
T3D图形引擎 整体结构 主要组件是应用程序框架(红色),渲染器... 在T3D中,每个对象都是同一层次结构的一部分,每个对象最终都有一个称为root的特殊对象作为祖先。 在大多数情况下,场景图实际上是一棵树,如下所示。
T3D是一个新的单一存储库,可以使用该库将少数几个小型项目的工作结合起来。 使用单仓库的目的是允许在项目的不同部分进行更快的迭代。 这也大大减轻了项目维护的负担。 该库包含用于解析和转换来自.dat存档的数据...
解密T3所有版本的软件,通过一年的数据测试。
用友T3标准版 用友T3标准...一、安装程序 二、系统管理 三、账务基础设置部分 四、账务处理 五、工资管理 六、固定资产 七、业务基础设置部分 八、采购管理部分 九、销售管理部分 十、库存管理部分 十一、核算管理部分